How to Install a Handheld Shower Head With a Diverter
As an Amazon Associate we earn from qualifying purchases. Details
The short answer to how to install handheld shower head with diverter is a seven-step job: prepare the arm, remove the old head, tape the threads, start the new head by hand, mount the hose, check every joint, then check each diverter position. A combination head has two outlets on one arm, so a leak can start at the arm, the hose or the switch. This guide sets out that sequence, shows what the combination listings state about their switches, and marks the steps the listings and the pages we opened do not settle.
Quick answer
- Prepare the arm first: check its thread against the listing, then turn off the water and remove the old head, using a rag and pliers if the arm will not hold still.
- Clean the threads, flush the line with the head off, and wrap thread sealant tape clockwise two or three times.
- Start the new head by hand, mount the holder, connect the hose as the manual shows, then turn the water on and check every joint.
- Check each diverter position after the install. The listings name their switches differently: FEELSO calls its part a built-in 3-way diverter, while egretshower describes a handle that switches between its heads.
What a diverter does on a combination head
A diverter is a switch that sends water to one outlet, to the other, or to both. On a combination head, the two outlets are usually a fixed head overhead and a handheld on a hose. The EPA describes the handheld half this way: “Hand-held showers are a subset of showerheads with moveable devices for directing water onto a user, usually a hand-held nozzle at the end of a hose.” A diverter head is therefore one fixed head and one handheld on a single arm, with the switch deciding which one runs.
Only one listing in the research pool uses the word diverter. The FEELSO record describes a “Tri-Mode Diverter” that runs overhead only, handheld only or both, and its bullets say the diverter is built in. The egretshower record says a rotating handle on the shower panel switches between its handheld and its showerhead, and that the two can be used separately or together. The VMASSTONE record describes a 4.7-inch panel that can be used as an overhead or a handheld shower, switched by rotating its handle. The SeaCity and Razime records describe a fixed head with a detachable handheld and do not name a switch at all.
The EPA’s FAQ describes combination units in terms that fit all of these heads. It says that “Multiple showerhead units are also eligible to receive the WaterSense label provided they are sold in combination in a single device intended to be connected to a single shower outlet.” It also says that “the entire device must meet the maximum flow rate requirement in all possible operating modes.” That sentence is about flow, not leaks, and it does not require a diverter. For an installer, the useful point is that one device on one outlet has several modes, so a check in one position does not cover the others. The mode-by-mode check in step seven is our suggested procedure, and none of the pages we opened prescribes it.
Parts and tools before you start
The New Jersey guidance lists the tools for a full cleaning: an adjustable wrench, needle nose pliers, a bowl, distilled white vinegar, thread sealant tape, a cloth and a toothbrush. A head swap needs less. You need the tape, a cloth or rag to protect the arm, and an adjustable wrench in case the arm will not hold still. The guidance uses a rag and pliers only when the arm is not sturdy during removal or reinstall, so keep them within reach rather than making them the first tool you use.
Check the parts against the listing before you turn off the water. The records name these items:
- FEELSO: a fixed head, an 8-mode handheld, a bracket, a hose, additional Teflon tape and instructions, according to its specifications.
- egretshower: a fixed head, a handheld, a drill-free stainless steel sliding bar with slider, a 6-inch shower arm with flange, a stainless steel hose, Teflon tape, an installation manual and a washer.
- VMASSTONE: a handheld head, a shower head mount, a stainless steel hose, Teflon tape and a flow restrictor. This post does not advise on fitting or removing the flow restrictor.
- SeaCity: installation hardware, an instruction manual, a handheld sprayer, a hose and a shower head.
The records do not give a count for each box, so compare the box with this list. A missing hose or bracket changes the job more than any single step below.
Tape comes in more than one name. The New Jersey guidance calls it thread sealant tape and says to wrap it “two or three times” around the arm, or “as many times as recommended by the manufacturer.” If the manual gives a count, follow the manual. Where a listing includes Teflon tape, you have tape in the box, but the same wrapping rule applies to either roll.
Step 1: Check the arm and the thread
Look at the arm before you open the box or turn anything off. Two records name a G1/2 thread. The FEELSO bullets say the head fits any standard shower arm with universal G1/2 threads, and the VMASSTONE bullets name a G1/2 thread for most standard shower arms. The SeaCity bullets say it fits any standard connection. The egretshower record includes its own 6-inch arm with a flange, so if you use that arm, the old one does not have to fit the head.
The pages we opened do not match any thread standard to a particular arm, and none of the records names an arm standard beyond G1/2 or a standard connection. If the thread on your arm is not clearly one of those, check it against the listing and the manual before you remove anything. If the arm itself needs replacing, the work goes beyond a head swap, and this guide does not cover it.
Step 2: Turn off the water and remove the old head
Turn off the water to the shower before you start. The New Jersey guidance begins with the old head and says to try removing it by hand first. Grip the head or its connecting nut, depending on the design, and turn counterclockwise. If it will not move, the guidance says to wrap the shower arm with a rag or cloth, hold it with pliers, and use an adjustable wrench on the head until it loosens. Then unscrew it completely by hand.
Keep a towel over the drain while you work, so a dropped washer or screw does not go down it. That is a practical step rather than a sourced requirement, and it costs nothing.
Step 3: Clean the arm threads and flush the line
Remove any existing thread sealant tape from the threaded end of the arm, as the guidance says to do first. Clean off visible rust or mineral deposits with a cloth or toothbrush. The guidance also recommends using this moment to flush the plumbing: “You should use this opportunity to flush the plumbing with water without the flow being restricted by the showerhead.” Run the water through the open arm briefly, then turn it off and dry the threads completely before you tape them.
A clean, dry thread is the base for the tape. If mineral deposits sit in the thread grooves, scrub them out before you wrap, because tape laid over a rough thread does not sit flat. This is the sequence the guidance describes, so there is nothing to add from outside it.
Step 4: Wrap the tape clockwise
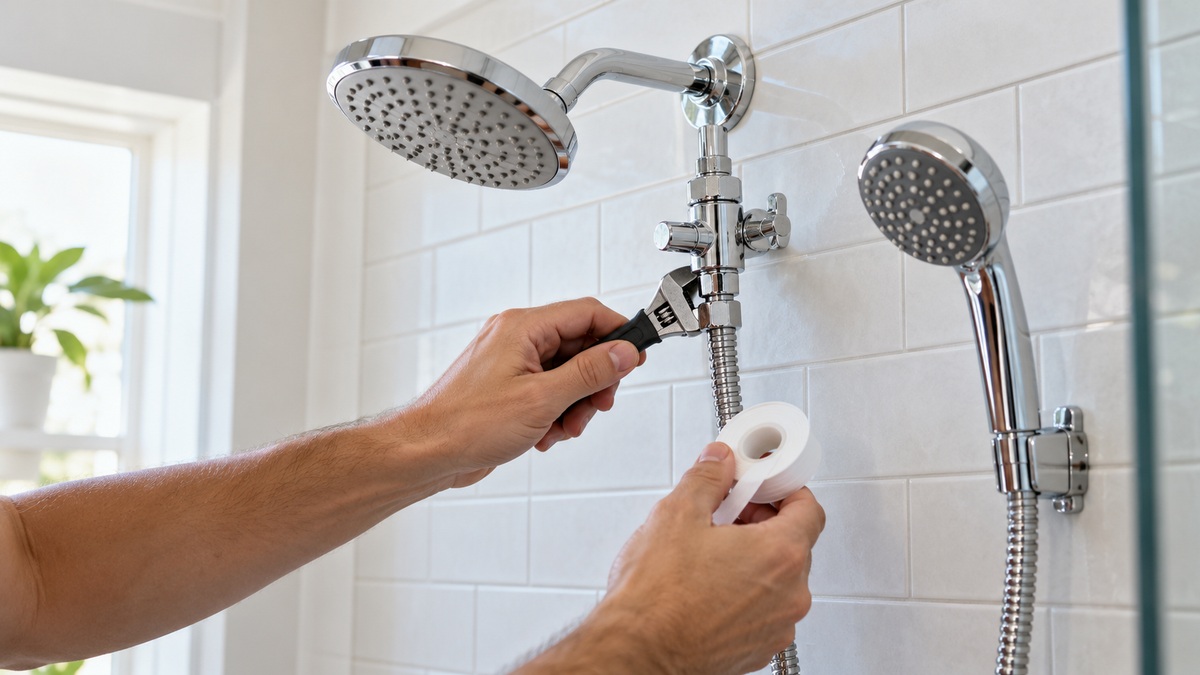
Wrap thread sealant tape clockwise two or three times around the threads, pressing it into the grooves as you go. The guidance gives the direction and the count: “Wrap thread seal tape in a clockwise direction two or three times around the threads of the shower arm (or as many times as recommended by the manufacturer).” The guidance also says to screw the new head on clockwise, so the direction of the tape and the direction of the head match.
Do not wrap so much tape that the joint fills and the head will not seat. The guidance does not describe a limit, so stay within the two-or-three-turn count it gives unless the manual says otherwise.
Step 5: Start the head by hand, then mount the holder and hose
Start the new head by hand, turning clockwise, and stop when it is snug. The guidance says that if the shower arm is not sturdy, you may need a rag and pliers to hold it while you screw the head on. Hand-tighten and stop there. The guidance reserves an adjustable wrench for a connection that leaks, so a wrench on a new, dry joint is the wrong first move. Over-tightening is the mistake to avoid, and none of the pages we opened gives a torque figure for any listing in this set.
Mount the holder before you attach the hose, so the hose has a place to hang while you check it. The listings mount in different ways. FEELSO includes an adjustable holder and lists an adhesive holder option. The egretshower set includes a drill-free sliding bar with a slider. The SeaCity head includes an 11-inch extension arm with a swivel connector, and its specifications name an adjustable height. None of the records states which wall surfaces its mount needs, and an adhesive mount depends on the wall, so check the maker’s surface guidance before you stick anything to tile or painted wall.
Then attach the hose at the handheld end and at the head, as the manual shows. The records in this set do not include a diagram of the diverter ports or of which hose end goes where, so the manual is the source for that step. Tighten each hose joint by hand first, then follow any torque guidance the manual gives. If the box includes washers, use them where the manual shows them.
Step 6: Turn the water on and check every joint
Turn the water on and check for leaks. The New Jersey guidance says so directly: “Turn the water on and check for leaks.” Look at the arm joint, both hose joints and the body of the diverter. If a connection drips, the guidance says: “If the connection does leak, re-wrap the threads with thread sealant tape and carefully tighten again with an adjustable wrench.” Turn the water off, re-wrap, and tighten carefully rather than forcing the joint.
A drip from the diverter body is a different problem from a thread leak. The pages we opened do not explain how to repair a diverter, so if the body leaks, stop and contact the maker or a plumber rather than taking the switch apart. This guide covers a head and arm swap, and a diverter repair goes beyond it.
Step 7: Check each diverter position
Switch the head through each position it offers: overhead only, handheld only, and both where the design allows. Check each joint in each position, and let the water run long enough to see a drip if one is going to start. This final check is our suggested procedure, not one that any of the pages we opened prescribes. It matters because the EPA’s combination rule covers the whole device in every operating mode, so a clean result in one position does not show that the other positions are clean.
If a position leaks and the others do not, the problem may sit in the switch or in the hose connection that feeds that outlet. Work through the joints in that position first, using the re-wrap and careful-tightening steps above. If the leak persists, stop and contact the maker or a plumber.
Common mistakes
The first mistake is skipping the leak check after the install. The guidance calls for turning the water on and checking for leaks, and a head that looks seated can still drip at a joint.
The second mistake is leaving old tape on the threads. The guidance says to remove any existing thread sealant tape before wrapping new tape, because old tape under new tape leaves an uneven seal.
The third mistake is assuming the number on the box is the number at your tap. The EPA says that “Usually showerhead product packaging lists the flow rate at 80 psi, while most mixing valves … are rated at 45 psi, making it difficult to match these components.” A head that is rated well at 80 psi can behave differently behind a valve rated at 45 psi, so match the head to the valve, not to the box alone.
The fourth mistake is trusting the install time in the listing. FEELSO says the head “installs in just minutes,” and egretshower says no tools are required. The pages we opened do not time an installation, so both statements stay listing claims, and a diverter install with a new arm will take longer than a plain head swap.
The fifth mistake is forgetting the mixing valve. Penn State Extension says that reduced-flow showerheads “can be sensitive to low water pressure and sudden changes in temperature,” and that “proper pressure-balanced mixing valves are necessary.” A head swap does not change the valve, so a shower that runs hot or cold after the install is a valve question, not a head question.
Choosing a combination head that suits the install
Pick the head whose switch and parts the record states, rather than the one with the longest list of features. Four listings in the pool describe a combination with a switch or a second outlet, and they differ in how much the record confirms:
- A head with a named diverter and a parts list that matches the install: FEELSO, with a built-in 3-way diverter and a bracket, hose and tape named in the record.
- A head whose handle switches between two heads and whose arm is included: egretshower, which suits a bathroom where the old arm is due for replacement anyway.
- A panel that switches overhead and handheld on a standard G1/2 connection: VMASSTONE, with the caveat that its switch is a panel mode, not a separate valve.
- A fixed rain head with a detachable handheld and an adjustable arm: SeaCity, which names its parts but does not describe how the handheld switches.
1. FEELSO Shower Head with Handheld Combo, 8″ High Pressure Double Shower Head (Built-in 3-way diverter, overhead, handheld or both)
Specs from the listing (checked ):
- Hose Length: 71 inches
- Included Components: 7-Spray Fixed Showerhead, 8 Modes Hand Held Spray, Bracket, Hose, Additional Teflon Tape, Instructions
- Installation Type: Wall Mounted
- Other Special Features of the Product: High Pressure, 7+8 Modes Dual Shower Head, Anti-Clog Nozzles, 71″ Hose Extra Long, Adhesive Holder, Shower Separately or Together
Pros
- The bullets name a built-in 3-way diverter that runs overhead only, handheld only, or both at once, which is the switch this question is about.
- The specifications list a bracket, a 71-inch hose and additional Teflon tape among the included components.
Cons
- The record does not describe the diverter's port layout or which hose end attaches where, so the hose step depends on the manual.
- The mount is an adjustable holder with an adhesive option, but the record does not state which wall surface the adhesive needs.
Best for: A bathroom that needs a switch between a rain head and a handheld on one arm, with a long hose for seated or child bathing as the bullets describe.
Skip if: You want a written install sequence for the diverter itself, because the record does not include one.
View on Amazon (affiliate link)
2. High Pressure Handheld/Rain 82-mode 3-way Shower Head Combo with 25.75″ Adjustable Drill-free (Handle switches between fixed and handheld heads)
Specs from the listing (checked ):
- Included Components: Fixed Shower Headr, Handheld Shower Headr, stainless steel drill-free sliding bar with slider, 6″ Shower Arm with Flange, stainless Steel Shower Hose, Teflon Tape, Installation Munual, Washer
- Number of settings: 10, 9
- Hose Length: 5 feet
- Installation Type: Wall Mounted
Pros
- The bullets say a rotating handle on the shower panel switches between a 10-setting handheld and a 9-setting showerhead, which can be used separately or together.
- The included components list a 6-inch shower arm with flange, Teflon tape and a washer, so the connection parts are named in the record.
Cons
- The bullets do not call the handle a diverter, so the switch is described only in the listing's own words.
- The bullets describe a drill-free slide bar, but the record does not say which wall surfaces it needs.
Best for: A reader who wants one handle to choose between two heads, on a set that already includes the arm.
Skip if: You want to keep your existing shower arm, since the set includes its own 6-inch arm with flange.
View on Amazon (affiliate link)
3. High Pressure Handheld Shower Head VMASSTONE 7-Spray Setting Showerhead Kit with 59″ Stainless (Panel switches overhead or handheld, flow restrictor included)
Specs from the listing (checked ):
- Included Components: Flow Restrictor, Handheld Shower Head, Shower Head Mount, Stainless Steel Hose, Teflon Tape
- Hose Length: 59 inches
- Number of settings: 7
- Flow Rate Description: 1.8 Gallons per Minute @ 80 Psi, 2.5GPM of Head
Pros
- The bullets say the 4.7-inch panel can be used as an overhead or a handheld shower, and that rotating the handle switches the mode.
- The included components list Teflon tape, a stainless steel hose and a shower head mount, and the bullets name a G1/2 thread for most standard shower arms.
Cons
- The record lists a removable flow restrictor among the included parts, and this post does not advise on fitting or removing it.
- The record names no separate diverter valve, so the switch is a panel mode, not the diverter that the FEELSO record describes.
Best for: A user who wants overhead and handheld modes from one panel, on a standard G1/2 arm.
Skip if: You need a separate diverter valve, since the record describes a panel switch only.
View on Amazon (affiliate link)
4. Black Rain Shower Head with Handheld Shower Head, 5 Spray Modes (Fixed rain head with a detachable handheld)
Specs from the listing (checked ):
- Included Components: Installation hardware, Instrument manul, handheld shower sprayer, hose, shower head
- Number of settings: 1
- Hose Length: 60 inches
- Other Special Features of the Product: Adjustable Height, Detachable, Leak Proof, Rust Proof
Pros
- The bullets describe a fixed rain head with a detachable handheld and an 11-inch metal extension arm with a swivel connector for height and angle.
- The specifications list installation hardware, a hose and a handheld sprayer among the included components, and name a life time warranty.
Cons
- The title says 5 spray modes, but the specification table says 1 setting, so the mode count conflicts inside the record.
- The record does not say how the handheld switches from the fixed head, so the diverter step cannot be confirmed from it.
Best for: A household that wants a fixed rain head and a detachable handheld on an adjustable height arm.
Skip if: You need a described switch between the two heads, because the record does not state one.
View on Amazon (affiliate link)
How we chose
The research pool holds twelve listings for this question. Each record stores titles, bullets and specifications, and none stores a price or a rating, so neither appears in this post. We kept the listings that describe a fixed head and a handheld on one connection, or a switch between them. Eight listings are not carded, and the note below gives the reason for each.
Our criteria, in order:
- A shower head with a second outlet, a switch, or a documented fixed-and-handheld pair.
- The parts the record says are included, such as the hose, bracket, tape and arm.
- The connection the record names, G1/2 or a standard connection.
- Any conflict inside the record, which the cons report rather than hide.
The cards are not a ranking. Each one fits a different install situation that the record supports: a named diverter, a handle switch with its own arm, a panel switch on a standard connection, and a dual head with a detachable handheld.
Listings without a card
These listed items are not carded. Each reason is taken from the record.
- NearMoon handheld, matte black: a handheld with a 5-foot hose and one setting. Its record names no fixed head, so it has no second outlet to switch to, and it does not answer the diverter question.
- Garpok filtered shower head with handheld: the title pairs a head with a handheld, and the record gives a 72-inch hose, a metal holder and two filter elements. It does not say whether the head has a separate fixed outlet. Its filter wording is a manufacturer claim that this post does not repeat.
- CWPW filtered shower head with handheld: the record names an on-off switch and a pause button but no second outlet. The filter wording in its record is a manufacturer claim, and this post does not carry it into the install steps.
- AULEEND slide bar with handheld: a 5-function handheld with a 59-inch hose on a slide bar with two adjustable brackets. The bullets say the slide bar needs assembly. The record names no fixed head or diverter.
- OFFO slide bar: a 24-inch segmental slide bar with a holder. Its record lists a slide bar and holder as components, not a shower head.
- KAIYING self-adhesive holder: the record lists a single shower bracket and no head, so it is a holder for a head, not a head.
- HammerHead metal 3-spray shower head: the research record holds only a title. It has no bullets or specifications, so no card can be written from it.
- Razime 12-inch rain head with handheld: a fixed rain head and a detachable handheld on a magnetic dock. Its specifications list only a shower head as included, so the hose and the connection cannot be confirmed from the record.
What we could not verify
- The diverter port layout and which hose end attaches where. None of the records includes a diagram, so the manual is the only source for that step.
- Whether a switch other than the FEELSO diverter works as a diverter in the plumbing sense. The records describe handles, panels and modes, and none explains the internal valve.
- The FEELSO claim that installation takes minutes, the egretshower claim that no tools are needed, and any other install time. The pages we opened do not time an installation.
- Which wall surfaces each adhesive or drill-free mount needs. The records do not state a surface list for any of them.
- Whether a given head threads onto your arm. FEELSO and VMASSTONE name G1/2, and SeaCity says it fits a standard connection. The pages we opened do not match any thread to a particular arm.
- The FEELSO wording about a solid brass core and a leak-proof structure. The record says it, and we opened no certification document for it.
- The lifetime warranty and professional technical support wording in the FEELSO bullets. The record does not define either term.
- Any filter or skin claim in the Garpok and CWPW records. This post does not repeat those claims, and the record names no certification for them.
Related guides
- Moen dual shower head with slide bar is the closest read for a fixed head and a handheld on one slide bar.
- Hand-held shower head extension hoses covers the hose side of the handheld decision.
- Hand-held shower heads for seniors covers mounting height and reach for seated users.
FAQ
Do I need a diverter to have both a fixed head and a handheld?
No. The FEELSO record calls its part a built-in 3-way diverter, and the egretshower record describes a handle that switches between its two heads. The SeaCity record describes a fixed head with a detachable handheld and names no switch. The EPA’s FAQ describes combination units sold as one device for one shower outlet, which covers all of these heads, but it does not require a diverter. The switch type is a product question for each listing.
Can I keep my existing shower arm?
Often, but check the thread first. FEELSO and VMASSTONE name G1/2 threads, and SeaCity says it fits any standard connection. The egretshower set includes its own 6-inch arm with a flange, so if you use that arm, the old one does not have to fit the head. The pages we opened do not match a thread to a particular arm, so measure or check the existing arm against the listing before you buy.
What tape should I use?
Use thread sealant tape, which is the term the New Jersey guidance uses. Wrap it clockwise two or three times, or as many times as the manufacturer recommends. The FEELSO, egretshower and VMASSTONE records each include Teflon tape. Follow the manual if it gives a count.
What if the connection leaks after the install?
Turn the water off, re-wrap the threads with thread sealant tape, and tighten carefully with an adjustable wrench, as the New Jersey guidance says. If the drip is at the diverter body or inside the wall, stop and call a plumber, because the pages we opened do not cover diverter repair.
Is this a job I can do myself?
The EPA encourages consumers to follow manufacturer instructions and work with plumbing professionals to ensure proper installation. This guide covers swapping a head and its arm. If a valve, the wall or the arm itself needs work, call a plumber. Penn State Extension says reduced-flow heads need proper pressure-balanced mixing valves, which is a valve question that a head swap does not answer.
Bottom line
Follow the sequence: clean and tape the threads clockwise, start the head by hand, check every joint with the water on, then check each diverter position. Choose a combination head whose switch and parts the record states, and call a plumber if the job goes beyond a head and arm.
Sources
- US EPA, WaterSense: Showerheads: WaterSense maximum 2.0 gpm, pressure compensation, spray force
- US EPA, Frequently Asked Questions: WaterSense Labeled Showerheads (archived 2017 snapshot): hand-held showers in scope, combination units sold for a single outlet, packaging at 80 psi, mixing valves at 45 psi, plumbing professionals
- New Jersey Department of Health, Guidance for Removing and Cleaning a Shower Head (PDF): removal, thread tape clockwise, reinstall by hand, leak check and re-wrap
- Penn State Extension, Household Water Conservation: reduced-flow heads sensitive to low pressure, pressure-balanced mixing valves