how-to-unclog-shower-head-holes
As an Amazon Associate we earn from qualifying purchases.
Knowing how to unclog shower head holes comes down to a few steps: take the head off the arm, soak it fully in distilled white vinegar overnight, then clear each clogged hole with a needle, a straightened paper clip, or a thin wire. Rinse the head, reinstall it, and check for leaks. The steps below follow the New Jersey Department of Health guidance and Moen’s care guide. Both sources name mineral deposits as the cause of the blockage, so the method targets those deposits.
Quick answer
- Turn off the water, then try to unscrew the head by hand. If it will not come off, hold the arm with a rag and pliers and loosen the head with an adjustable wrench.
- Soak the head in distilled white vinegar, fully submerged, overnight.
- Clear each clogged hole with a needle or straightened paper clip. Moen’s guide uses a thin wire on the outlet and inlet holes.
- Flush the head with clean water, reinstall it, turn the water on, and check for leaks.
- Do not use bleach. Moen’s guide says so for its fixtures.
- If the head is difficult to service, the New Jersey guidance says a qualified plumber is the safer choice.
Why shower head holes clog
The New Jersey Department of Health guidance says that naturally occurring minerals can build up and block the nozzles (holes) through which water passes. The same guidance says that regular cleaning of the shower head keeps it working properly and allows consistent water flow.
Moen’s care guide describes the sign to watch for. In its words, if you have a showerhead that is spraying unevenly, it may be clogged with mineral deposits. An uneven spray pattern is the clue the guide gives. Check the face of the head for holes that are spraying unevenly while the others run normally.
The Penn State Extension page on water softening says that hard water causes gray or white deposits when water is heated. The page is about water softeners, not shower heads, so it is background on where the deposits come from rather than a cleaning method.
Flow numbers give context for why clogged holes matter. The EPA WaterSense showerhead page says standard showerheads use 2.5 gallons of water per minute (gpm). It also says that water-saving showerheads that earn the WaterSense label “must demonstrate that they use no more than 2.0 gpm.” The EPA page does not describe clogging or give a cleaning method, so these flow figures are context only.
How we chose the steps
This guide is built from four pages we opened on 2026-10-27: the EPA WaterSense showerheads page, Moen’s care and cleaning guide (form MF854, dated 2015 on its cover), the New Jersey Department of Health guidance for removing and cleaning a shower head (dated 09.23.25 in its file name), and the Penn State Extension water-softening page. A step is included here only when one of these sources states it. Steps that appeared only in search snippets or in product listings are left out.
Two of the sources give cleaning steps. The New Jersey guidance covers the whole process, from removing the head to checking for leaks. Moen’s guide covers clearing the holes with a thin wire and flushing the head, and it warns against bleach. The New Jersey guidance adds the vinegar soak, which Moen’s guide does not describe for showerheads.
The product part of this guide draws only on the ten listings in the product file, which records a check on 2026-10-23 that covered 48 search results. Only the product specifications each listing states are used, and nothing else about the listing. The file does not rank the products, and this guide does not rank them either. One listing is a drain snake for hair clogs in sink and tub drains, not a nozzle tool, so it is left out.
What you need
- An adjustable wrench and a pair of needle nose pliers
- A cloth or rag, to hold the shower arm while you loosen the head
- A bowl large enough to hold the whole head under liquid
- Distilled white vinegar
- A needle or a straightened paper clip, or a thin wire, for the holes
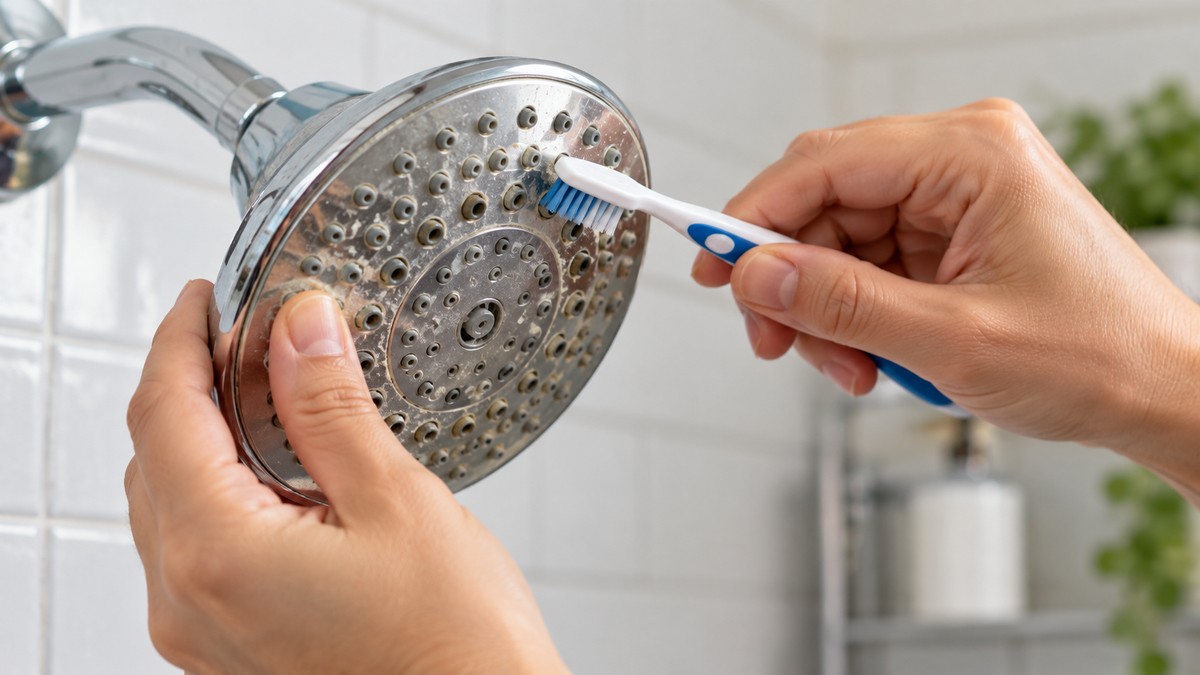
- A toothbrush, for debris on the face and in the filter screen
- Thread sealant tape, for the reinstall step
The New Jersey guidance lists the vinegar, bowl, wrench, pliers, thread sealant tape, and cloth as supplies. Moen’s guide does not list a supply set. It describes the wire method and the wrench jaws.
Step-by-step: how to unclog shower head holes
Step 1: Turn off the water and remove the head
Turn off the water before you start. The New Jersey guidance includes turning off the water and completely drying the arm threads as part of its cleaning steps.
Begin by trying to unscrew the head by hand. The guidance says, “First, try removing the shower head by hand.” Grip the head or its connecting nut and turn it counterclockwise. If it does not come off, wrap the shower arm with a rag or cloth, use pliers to hold the arm in place, and loosen the head with an adjustable wrench. Then finish unscrewing it by hand.
Moen’s guide describes a similar sequence for its own fixtures. It says to unscrew the swivel ball nut with a wrench or channel-type pliers, and then to unscrew the collar nut from the showerhead. Moen also says to wrap the jaws of the tool with masking tape, or use a cloth, to prevent scratching the finish. That applies to any tool that touches a finished part.
Step 2: Take the head apart and clear the filter screen
The New Jersey guidance says to take the shower head apart, and if you no longer have the owner’s manual, to take photos so you can remember how the pieces go back together. Take those photos before you start.
Many heads have a filter screen inside. The guidance says, “Shower heads often have a filter screen inside that can be removed with a pair of needle nose pliers.” Remove it and clean it. The guidance says to rinse the screen with water, or to use a toothbrush with an all-purpose cleaner or dish soap for stubborn, sticky debris.
The sources we opened do not describe how to free a part that is stuck, so this guide does not add a method for that.
Step 3: Soak the head in distilled white vinegar overnight
Fully submerge the head in vinegar. The New Jersey guidance says to “fully submerge the shower head in a bowl of distilled white vinegar and let it soak overnight.” Keep the whole head under the liquid for the full soak, so that the face and the holes are covered.
Overnight is the only soak time the sources we opened give for a showerhead. The sources do not say whether a shorter or longer soak works better, or whether warming the vinegar changes anything, so this guide does not give those figures.
Step 4: Clear each clogged hole
This is the step that clears the clog. The New Jersey guidance says, “Use a needle or straightened paper clip to unblock any holes in the showerhead that are still clogged by mineral deposits.” Work through the face one hole at a time, and clear every hole that is still blocked after the soak.
Moen’s guide describes a similar step for its own fixtures. It says to clean “the outlet and inlet holes with a thin wire and flush the head with clean water.” A thin wire is the tool Moen names, and a needle or straightened paper clip is the tool the New Jersey guidance names. Use the tool that fits the hole.
The sources we opened do not say how many soak-and-clear rounds a head needs or what to do if a hole stays blocked, so this guide does not set a number or add a method for that.
Step 5: Flush, reinstall, and check for leaks
Flush the head with clean water. Moen’s guide says to flush the head with clean water after clearing the holes.
Reinstall the filter screen if you removed it. The New Jersey guidance says, “Reinstall the filter screen when cleaned.” Then screw the head back onto the arm by turning it clockwise. The guidance says to wrap the arm with a rag and use pliers to hold it in place if the arm is not sturdy.
Before you finish tightening, wrap the arm threads. The guidance says to “Wrap thread sealant tape in a clockwise direction two or three times around the threads of the shower arm (or as many times as recommended by the manufacturer).” If the head’s instructions give a number of wraps, follow that number.
Turn the water on and check for leaks. The guidance says, “Turn the water on and check for leaks.” If the connection leaks, it says to “re-wrap the threads with thread sealant tape and carefully tighten again with an adjustable wrench.” The sources we opened do not describe repairing the arm or the connection beyond that, so this guide does not go further.
Common mistakes to avoid
- Using bleach. Moen’s guide says, “Do not use bleach.” It adds that “Even when diluted, bleach can cause corrosion when exposed to stainless steel for extended time periods.” This guide does not use bleach in any step.
- Using abrasive pads on the finish. Moen’s guide warns that some pads and sponges can scratch a faucet’s finish. For debris, the New Jersey guidance names a toothbrush with an all-purpose cleaner or dish soap.
- Clearing holes with the head still on the arm. The New Jersey guidance describes the soak and the clearing with the head removed.
- Skipping the leak check. The guidance includes a leak check after reinstalling. Do not skip it.
- Forcing a difficult head. The New Jersey guidance says that if the head is difficult to service, a qualified plumber is the safer choice.
Checking the result
After the head is back on and the water is running, look at the spray. The New Jersey guidance ties the purpose of cleaning to consistent water flow, so an even spray across the face is the result to look for.
If the spray stays uneven after the soak and the clearing, the sources we opened do not say what else to check. Moen’s guide describes the uneven spray as a sign of mineral deposits and gives no other cause, so this guide does not go further.
Product options from the product file
The product file lists ten keyword-search listings for clearing shower head holes. The table below shows what each listing states about its contents and its pick or pin sizes. Where a listing does not state a size, the table says “not stated.” This is a summary of stated facts, not a ranking.
| Listing brand | Pieces (as stated in title or bullets) | Pick or pin sizes the listing states |
|---|---|---|
| Lanjiesh | 20 brushes | Brushes for holes larger than 0.02 inch (0.5 mm) |
| HANSPORTA | 30 (20 brushes, 10 picks) | Picks 0.015 to 0.05 inch |
| uadbau | 30 (20 brushes, 10 pins) | Pins 0.015 to 0.05 inch; picks 0.078 and 0.098 inch |
| Sublaga | 80 (70 brushes, 10 picks) | not stated |
| ZAOVAAV | 30 (20 brushes, 10 pins) | Pins 0.015 to 0.05 inch; picks 0.078 and 0.098 inch |
| Eldraqth | 70 | not stated (each pick about 6 cm, or 2.3 inches, long) |
| Qixiang CB | 30 | not stated |
| Hadnves | 80 (70 brushes, 5 hooks, 5 bristle brushes) | not stated |
| DOQXYAVM | 90 (70 brushes, 10 picks, 10 detail brushes) | Picks 0.015 to 0.05 inch |
Four listings state pick or pin sizes in the 0.015 to 0.05 inch range. Three of them are linked below. The links are for viewing the listing, not an endorsement of a ranking.
- HANSPORTA, 30-piece set. The listing describes multiple-sized picks in the 0.015 to 0.05 inch range, plus fine brushes and a storage case. View on Amazon
- uadbau, 30-piece set. The listing states two picks at 0.078 and 0.098 inch, pins at 0.015 to 0.05 inch, and a storage case. View on Amazon
- DOQXYAVM, 90-piece set. The listing describes ten stainless steel picks at 0.015 to 0.05 inch, plus brushes and detail brushes. View on Amazon
The Lanjiesh and DOQXYAVM listings disagree with themselves. Their specification tables show a unit count of 1, while their titles and bullets describe 20 and 90 pieces. This guide reports the title and bullet counts and flags the conflict rather than choosing one figure.
A pick or pin is a tool for the clearing step. The sources above name a needle, a straightened paper clip, or a thin wire for that step, so a listing’s pick sizes describe what the listing offers and nothing more.
What we could not verify: what the sources do not say
- Thread size. The sources we opened do not state the thread size for a showerhead or the shower arm, so this guide does not give one.
- Cleaning interval. The New Jersey guidance says regular cleaning but does not give a schedule. Moen’s guide does not give one either.
- Soak times other than overnight. The guidance gives overnight for the vinegar soak. The sources do not give a shorter time or compare soak lengths.
- Other cleaners. The sources do not compare vinegar with other cleaners for showerheads. The New Jersey guidance names dish soap only for the filter screen.
- Other brands’ care pages. The Delta support page returned a 404, and the Kohler support page returned a 403, so this guide does not include their steps. The Speakman care page opened, but its copy did not contain the cleaning text we looked for.
- Listing claims. The sources we opened do not confirm the pick and pin sizes stated by the listings. Treat them as the listing’s own statements.
- Fit with a given head. The sources do not say which tool fits which hole in a given showerhead model.
- Repairs beyond the holes. The sources do not cover repairing the arm, the connection, or the valve, so this guide stays with clearing the head.
FAQ
Can I clear shower head holes without taking the head off?
The New Jersey guidance removes the head before the soak and before clearing the holes. The sources we opened do not say whether the holes can be cleared with the head still on the arm, so this guide does not recommend that.
Is distilled white vinegar the right soak?
The New Jersey guidance specifies distilled white vinegar and an overnight soak. The sources we opened do not compare it with other solutions, so this guide does not recommend another one.
What if a hole is too small for a needle?
The New Jersey guidance names a needle or a straightened paper clip, and Moen’s guide names a thin wire. The listings in the product file state pick sizes from 0.015 to 0.05 inch, but the sources do not say which size fits which hole.
How do I know the head is clogged and not just dirty?
Moen’s guide ties uneven spray to mineral deposits, saying a head that is spraying unevenly may be clogged with mineral deposits. The New Jersey guidance says that minerals build up and block the nozzles. The sources we opened do not give a test that separates a clog from dirt.
Why are the deposits white or gray?
The Penn State Extension page says hard water causes gray or white deposits when water is heated. That page is about water softening, not shower heads, so it does not say more about the deposits on a head.
When should I call a plumber?
The New Jersey guidance says, “If you’re unsure or if your shower head is difficult to service, it’s safest to hire a qualified plumber.” Follow that advice if you are not sure how to take the head off or if the head is hard to service.
Bottom line
Soak the head in distilled white vinegar overnight, clear each clogged hole with a needle, straightened paper clip, or thin wire, then rinse, reinstall with thread sealant tape, and check for leaks. Do not use bleach, and call a plumber if the head is difficult to service.
For related reading on this site, see a separate guide on clearing clogged shower head nozzles, a guide to cleaning a shower head with vinegar, a guide for rain shower heads with rubber nozzles, a look at whether a shower filter softens hard water, and a roundup of shower head cleaners.
Sources
- EPA WaterSense, showerheads: https://www.epa.gov/watersense/showerheads (opened 2026-10-27)
- Moen, Care and cleaning guide, form MF854, dated 2015: https://assets.moen.com/moencom/documents/literature-center/mf854.pdf (opened 2026-10-27)
- New Jersey Department of Health, Guidance for Removing and Cleaning a Shower Head: https://www.nj.gov/health/cd/documents/topics/legion/shower_head_09.23.25.pdf (opened 2026-10-27)
- Penn State Extension, Water Softening: https://extension.psu.edu/water-softening (opened 2026-10-27)