distilled-white-vinegar-for-cleaning-shower-head
As an Amazon Associate we earn from qualifying purchases.
When mineral crust blocks the spray holes in a shower head, distilled white vinegar for cleaning shower head parts is one of the most common home methods. The idea is simple: soak the head in vinegar so the mineral deposits loosen, then clear the holes by hand. This guide explains the steps the sources describe, the soak times they give, and the finishes they warn about. The sources do not fully agree on soak time, so we point out where they differ instead of picking one number silently.
Quick answer
- Remove the shower head if you can, then submerge it in distilled white vinegar. The New Jersey Department of Health guidance says to “fully submerge the shower head in a bowl of distilled white vinegar and let it soak overnight.”
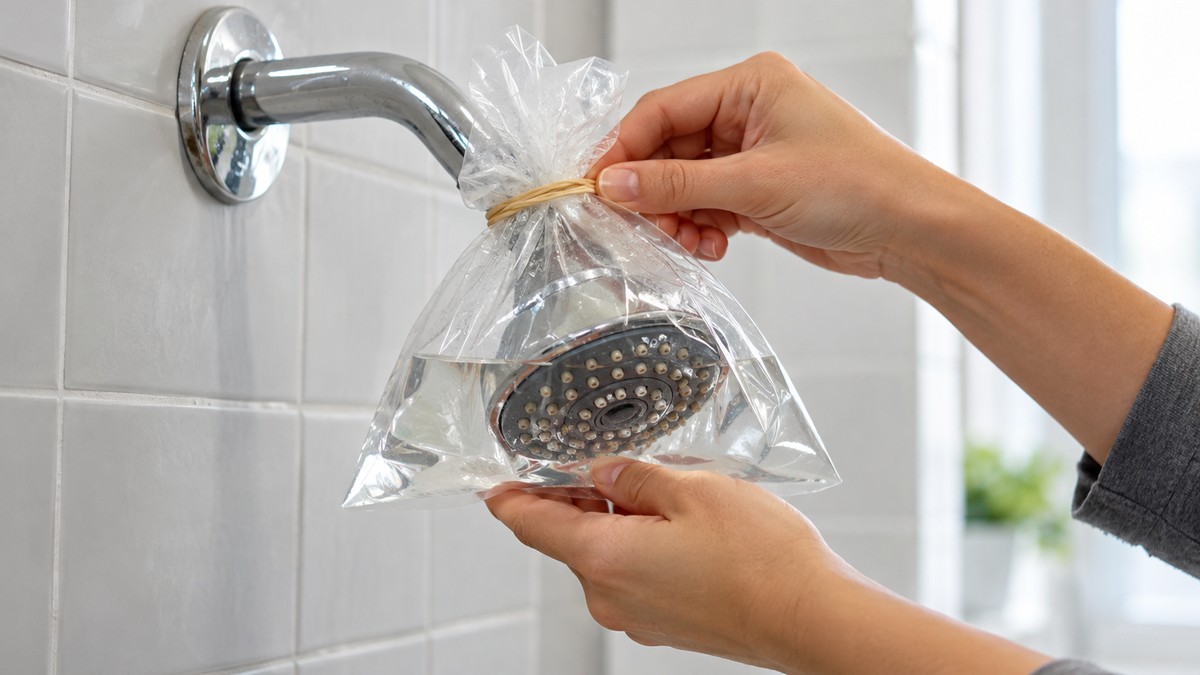
- This Old House describes a bag method for a head that stays on the arm: fill a gallon-size storage bag with “about one cup of white vinegar,” place it over the head, and soak for at least 8 hours or overnight.
- Limit the soak on some finishes. This Old House says vinegar “can damage or remove finishes such as nickel or brass,” and advises limiting the soak time to 30 minutes for fixed shower heads with those finishes.
- Moen’s care card for its Soft Grip finish lists “acids (e.g. vinegar)” among cleaners to avoid, so check your finish before you soak.
- Clear the spray holes with a needle or straightened paper clip, reinstall the head, turn the water on, and check for leaks.
How we chose
This post is built only from pages we opened on October 27, 2026. We looked for sources that cover cleaning a shower head directly, and we preferred a manufacturer’s own care document, a state health agency, and a university extension publication. This Old House is a home-improvement publisher rather than a manufacturer, so we treat its steps as one independent view and mark where it differs from the others.
Some pages gave no usable text. Delta support pages returned “Page Not Found” or a 404 error, Kohler’s cleaning how-to page returned a 403 error, and a University of Michigan cleaning page returned a 403 error. None of those are cited. The Speakman support page we opened was a navigation page without cleaning steps, so it is not cited either.
The criteria were simple. A step made the list only if at least one opened source states it. A soak time made the list only if the source giving it is named next to it. Where a step is only in one source, we say so. This is not a product ranking, and no products are named in this post.
What you need
- Distilled white vinegar. NJ uses the words “distilled white vinegar.” This Old House uses “white vinegar.” Neither source compares the two, so this guide follows the New Jersey wording.
- A container or bag. NJ uses a bowl. This Old House uses a gallon-size storage bag for a head that stays on the arm, and suggests a larger bag or shallow dish for a rain shower head.
- Rubber bands to hold a bag around the shower arm, as This Old House describes.
- An adjustable wrench, needle-nose pliers, and a rag or cloth. NJ uses these to loosen the head and to protect the shower arm while you work.
- A soft-bristled toothbrush and a microfiber cloth. This Old House uses these for scrubbing the nozzles and wiping the head dry.
- A needle or a straightened paper clip. NJ names the paper clip. This Old House names a needle.
- Thread sealant tape. NJ uses it when you reinstall the head.
How often to clean
This Old House gives a schedule that many households can follow. It says to do a basic cleaning monthly to remove surface buildup, a deep clean every quarter using the vinegar soak method, and an annual inspection for damage. For quick work between deep cleans, it suggests a spray bottle with equal parts water and white vinegar, and it says to “Run very hot water through the shower head for a few minutes once a week.” The article also says households with hard water may need to clean more often, because minerals build up faster there.
The reason minerals build up is the water itself. This Old House says that “Calcium and magnesium in hard water typically cause this buildup.” The University of Nebraska-Lincoln extension publication on hard water explains the same mechanism from the water side: “degree of hardness becomes greater as the calcium and magnesium content increases.” NJ states the practical effect: “Shower heads require routine cleaning to operate at full capacity.” In plain terms, a head with clogged holes will not deliver the spray it was designed to deliver, and vinegar is one way to loosen the deposits that clog those holes.
Step-by-step: cleaning the shower head with distilled white vinegar
Step 1: Remove the shower head
Start by trying to unscrew the head by hand, turning it counterclockwise, as NJ describes. Grip the head or the connecting nut, depending on the design. If it does not move, wrap the shower arm with a rag or cloth, hold the arm with pliers, and use an adjustable wrench on the head. Once it loosens, unscrew it the rest of the way by hand. If you cannot remove the head, This Old House’s method still works, because the bag can go over the head while it stays on the arm.
Step 2: Prepare the shower arm threads
Take off any old thread sealant tape from the threaded end of the arm. NJ says to clean away visible rust or mineral deposits with a cloth or toothbrush. Before you reattach anything, NJ suggests flushing the pipe with the head off, so water is not restricted by the head. Then turn the water off and dry the threads completely. Wrap new thread sealant tape clockwise around the threads two or three times, or as many times as the manufacturer recommends, and press the tape into the threads.
Step 3: Take the head apart if you can
Some heads come apart further. NJ suggests taking photos before you disassemble anything, especially if you no longer have the owner’s manual, so you remember how the parts go back together. Many heads have a filter screen inside. NJ says it can be removed with needle-nose pliers. Rinse the screen with water. For stubborn, sticky debris, NJ says you can use a toothbrush with an all-purpose cleaner or dish soap.
Step 4: Soak the head in distilled white vinegar
This is the core of the method, and this is where the sources differ most.
NJ’s approach is a bowl. The guidance says to “fully submerge the shower head in a bowl of distilled white vinegar and let it soak overnight.” This is the simplest version, and it fits a head you have already removed.
This Old House’s approach is a bag. It says to “Fill a gallon-size storage bag with about one cup of white vinegar.” It then says to put the head in the bag if you can remove it, or place the bag over the head if you cannot. Secure the bag around the shower arm with rubber bands, make sure the head is fully submerged, and “Let it soak for at least 8 hours or overnight.”
Both methods give a soak timed in hours, not minutes, but This Old House adds a limit for some finishes. In its fixed shower head section, it says: “Vinegar can damage or remove finishes such as nickel or brass, so limit the soak time to 30 minutes.” If your head has a nickel or brass finish, that limit conflicts with the overnight soak in the other two sources. The sources do not reconcile the two, so we recommend following the shorter limit for those finishes and checking the manufacturer’s care guide before you begin.
The sources do not give a vinegar-to-water ratio for the bowl method. The only amount given is the one-cup figure for a gallon-size bag in This Old House.
Step 5: Scrub the nozzles and clear the holes
After the soak, gently scrub the face of the head and the nozzles with a soft-bristled toothbrush, as This Old House recommends. Mineral deposits often sit inside the holes, not just on the surface. NJ gives the tool for that job: “Use a needle or straightened paper clip to unblock any holes in the showerhead that are still clogged by mineral deposits.” This Old House says the same thing in its own words, and adds a caution: use the needle to “poke out any stubborn particles in the nozzles carefully.” Push gently. A hole that is still blocked after a soak may need more loosening, and the sources do not describe a further step beyond repeating the soak and scrubbing.
Once the holes are clear, wipe the head with a microfiber cloth. This Old House says the cloth helps restore the shine. NJ says to reinstall the filter screen once it is clean.
Step 6: Flush the head and reinstall it
Before reinstalling, rinse the head thoroughly. This Old House says to remove the bag and run hot water through the head to flush out loosened deposits. Then screw the head back onto the arm by turning it clockwise. NJ says that if the arm is not sturdy, you may need to wrap it with a rag or cloth and hold it with pliers while you tighten the head.
Step 7: Turn the water on and check for leaks
Turn the water on and look closely at the connection. NJ says to “Turn the water on and check for leaks.” If the connection leaks, NJ says to “re-wrap the threads with thread sealant tape and carefully tighten again with an adjustable wrench.” Tighten gently and check again. The sources do not give a torque figure or a number of turns, so do not rely on a number you have not seen in a source.
Check the finish before you soak
Finish is the part of this guide where a careless soak can cause the most trouble. This Old House warns that vinegar “can damage or remove finishes such as nickel or brass.” It also gives a separate caution for rain shower heads: their larger surface and mounting hardware need extra care, and it says to be careful with the edges and the mounting hardware. Handheld heads need the head detached from the hose, and the sources say to clean both pieces and to pay attention to the connection points, which can collect buildup.
Moen’s care card gives a more specific warning. For the Soft Grip finish, it lists “acids (e.g. vinegar)” among the cleaners to avoid. It also says that failure to follow its cleaning instructions “may void Moen’s warranty.” The same card lists ammonia, bleach, and abrasive cleaners as products to avoid, and it names lime scale removers as harsh chemicals to avoid on its Spot Resist finish. It does not name vinegar for Spot Resist, which is why we do not say that vinegar is safe or unsafe for every Moen finish.
Before you soak, look up the finish on your own head. If the manufacturer’s care guide names vinegar or acids, follow that guide. If the finish is not listed, the sources in this post do not tell you whether vinegar is safe for it. In that case, a shorter soak, or a soft cloth and warm water first, is the more cautious choice, and it is a judgment call rather than a sourced rule.
Common mistakes to avoid
- Soaking a nickel or brass finish overnight. This Old House’s 30-minute limit for those finishes is the main conflict between the sources.
- Forgetting the filter screen. NJ says to clean it and put it back before you reassemble the head.
- Leaving old tape on the threads. NJ says to remove old sealant tape and clean the threads before wrapping new tape.
- Skipping the leak check. NJ says to turn the water on and check for leaks, and to re-wrap and tighten if the connection leaks.
- Treating a deep clean as a monthly chore. This Old House places the vinegar soak in the quarterly deep clean, and uses a basic cleaning for the monthly routine.
- Expecting a soak to fix a damaged head. The sources describe cleaning for mineral buildup. None describes repairing a cracked or corroded head, and NJ says that buying a new head is an alternative to cleaning an old one.
Related guides on this site
If the head still delivers weak spray after a careful cleaning, the cause may be the head itself, the water supply, or both. Our guide to shower heads for low water pressure covers the first case. If you are choosing a head that uses less water, our guide to water-efficient handheld shower heads explains what to look for. For a handheld head, see our notes on handheld shower heads and water pressure. If you want the shorter cleaning routine, read our guide to cleaning a shower head with vinegar. Finally, if you are weighing a different head altogether, our list of high-pressure shower heads that save water covers that choice.
What we could not verify: what the sources do not say
- No source gives a vinegar-to-water ratio for the bowl method. The only amount in the sources is “about one cup of white vinegar” for a gallon-size bag, in This Old House.
- The soak times disagree. NJ says overnight. This Old House says at least 8 hours or overnight. This Old House also says 30 minutes for fixed heads with nickel or brass. We cannot tell from these sources which is right for every finish.
- No source compares distilled and plain white vinegar. NJ specifies distilled, This Old House says white, and neither says the choice changes the result.
- No source says how much buildup vinegar removes, or how quickly it returns after cleaning.
- Moen’s card covers only its own finishes, and it does not name vinegar for Spot Resist. It does not cover shower heads from other brands.
- No source covers mixing vinegar with other cleaners. Moen’s card lists other chemicals to avoid, but it does not address combining products.
- The sources do not give a torque figure or number of turns for tightening the head or the tape.
- No manufacturer cleaning page for a shower head opened for this post. Delta and Kohler cleaning pages returned errors when fetched, so the manufacturer view here comes from Moen’s card only.
FAQ
Can I soak my shower head in distilled white vinegar overnight?
NJ says to soak the head overnight. This Old House says at least 8 hours or overnight for a bag method. However, This Old House limits the soak to 30 minutes for fixed shower heads with nickel or brass finishes. Check the finish first, and follow the manufacturer’s care guide if it gives a time.
Is distilled white vinegar better than regular white vinegar for this?
The sources do not compare them. NJ uses the words distilled white vinegar, and This Old House uses white vinegar. Neither source says one works better, so we do not make that claim.
How often should I clean my shower head?
This Old House suggests a basic cleaning every month, a deep clean with the vinegar soak every quarter, and an annual inspection for damage. It says households with hard water may need to clean more often.
Will vinegar damage my shower head?
It can, depending on the finish. This Old House says vinegar “can damage or remove finishes such as nickel or brass.” Moen’s care card lists “acids (e.g. vinegar)” among cleaners to avoid for its Soft Grip finish. Look up the finish before you soak, and do not assume that every finish is covered by these sources.
What if the holes are still clogged after soaking?
NJ says to use a needle or straightened paper clip to unblock holes that are still clogged by mineral deposits. This Old House says to poke carefully. The sources do not describe a further step. If holes stay blocked after repeated soaking and clearing, NJ notes that buying a new head is an alternative.
Do I have to remove the shower head to clean it?
No. This Old House describes a method where the bag goes over the head while it stays on the arm, secured with rubber bands. NJ’s steps begin with removing the head, and its cleaning steps include taking the head apart to reach the filter screen.
Bottom line
Distilled white vinegar for cleaning shower head holes works by loosening mineral deposits, and the sources agree on the basic steps: remove or isolate the head, soak it, clear the holes with a needle or paper clip, reinstall with new tape, and check for leaks. The main decision is the soak time. Use the overnight soak NJ describes for a plain finish that the manufacturer does not restrict. For nickel or brass finishes, follow This Old House’s 30-minute limit, and check the care guide for your head before you begin.
Sources
- New Jersey Department of Health, “Guidance for Removing and Cleaning a Shower Head.” https://nj.gov/health/cd/documents/topics/legion/ShowerHead_Cleaning_Guidance.pdf (opened 2026-10-27)
- Moen, care instructions INS2026A (finish care card). https://assets.moen.com/shared/docs/instruction-sheets/ins2026a.pdf (opened 2026-10-27)
- This Old House, “How To Clean a Shower Head.” https://www.thisoldhouse.com/cleaning/a-shower-head (opened 2026-10-27)
- University of Nebraska-Lincoln Extension, G1274 “Drinking Water: Hard Water.” https://extensionpubs.unl.edu/publication/g1274/na/html/view (opened 2026-10-27)